Connection Assignments
For meaningful actions to be performed with the server, connections must be assigned. The following connections are supported:
- PXE
- DHCP
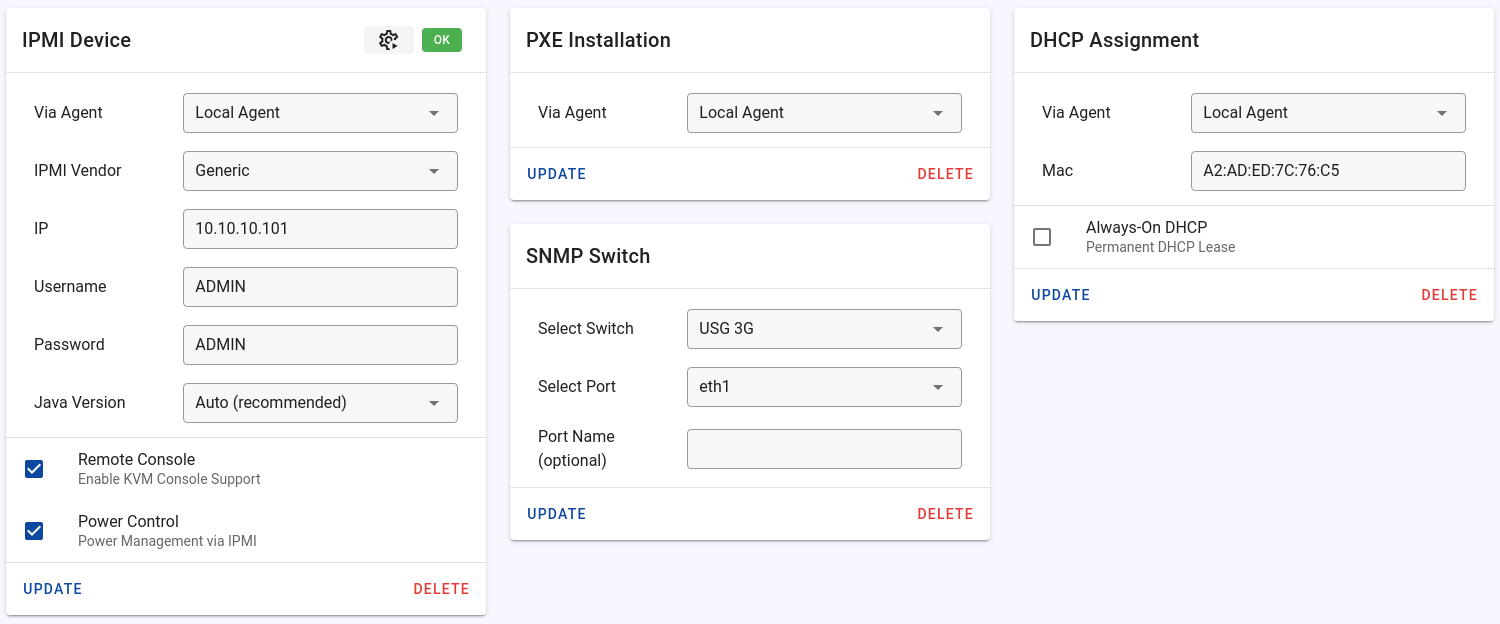
- IPMI
- Intel AMT
- PiKVM IPMI and VNC console
- PiKVM API-compatible devices (PiKVM, Glinet Comet KVM, ...)
- NanoKVM
- Cisco UCS
- Generic Web Browser Console
- Web resetter (TELEJET)
- PDU (list of supported devices)
- KVM over IP switches (list of supported devices)
- Switch port
- Switch port with PoE power control
- Proxmox
- VMware
- Hetzner Cloud
- Hetzner Dedicated
- OVH / Kimsufi / SYS
- myLoc / Webtropia / Servdiscount
- NovoServe (power management, IPMI, network usage collection)
- Tailor Made Servers
- GTHost
- ReliableSite
- InterServer
- Leaseweb
- Hostkey
- Remote Tenantos installations
- Generic / Custom External Provider
Remote Agents
For most connections you can choose which remote agent is responsible for handling the connection. You can choose this for each connection assignment separately.
Features
You can enable different features on each connection. The features are usually presented in the form of a checkbox.
Features would be, for example, a permanent DHCP lease or power control.
How to add a connection assignment
- Open the server detail page.
- Click on "Configuration" in the navigation menu.
- Click on the "Add Connection" button and select the type you want to add.
- Fill out the form and click on the "Add" button.
Switch Ports / PDU / KVM over IP Switches
To assign switch / PDU / KVM ports, you must first add the device to Tenantos.
Once the device has been added, you can add a connection to the servers as described above.
All SNMP-compatible switches are supported. Once port(s) are assigned to a server, bandwidth usage statistics become available on that server.
KVM over IP Switches
With KVM over IP switches, depending on the model, additional fields for overwriting the used username and password become available when adding connection assignments.
If these fields are offered, it means that the viewer is started without an isolated account. This can pose a security risk if the user somehow extracts the login credentials from the Docker container. However, if the KVM switch is within a private network or behind a firewall, the security risk is minimized. This is because the Docker container contains only a bare minimum of programs and user access to the switch from outside is restricted. Nevertheless, in this scenario, it is advised to create a dedicated user for each KVM port to limit the user to the intended KVM port.
If these fields are left blank, Tenantos defaults to the login credentials specified on the "Network Devices" page.
PoE Power Control
When adding a switch port, PoE power control can optionally be enabled. This makes it possible to supply power to devices such as Raspberry Pis directly through the switch.
The following switch types are supported:
- All switches that support the power-ethernet-mib SNMP MIB. It is important that SNMP write access is supported for this MIB.
- Through Advanced Switch Management, currently limited to Juniper switches.
PoE status and control methods can be configured independently, so that the power status to be read via SNMP while control is handled through Advanced Switch Management. This configuration is recommended for Juniper switches, as SNMP status polling is significantly faster.
When using SNMP, the correct SNMP port ID must be set. Although Tenantos attempts to map this automatically, accuracy cannot be guaranteed. Additional details are available in the tooltips within Tenantos.
Intel AMT
Intel AMT can be used for power control and remote consoles. However, if IPMI is available, it should be preferred, as it is more reliable and easier to manage. To use Intel AMT remote consoles, the following requirements must be met:
- Intel vPro with ACM activated.
- Dummy VGA/HDMI/DP plug. Otherwise, the screen output will be black.
If you encounter issues with Intel AMT, try setting the TLS mode to "Enforce TLS".
Note: Intel AMT does not support multiple simultaneous remote console sessions. Only one remote console can be opened at a time.
PDU Handling
Multiple PDU port assignments can be added for each server, allowing the servers to be redundantly connected to PDUs while still executing power actions through Tenantos.
It is also possible to add an IPMI connection in addition to the PDU port assignments. In this case, the IPMI connection serves as the primary power management source if the power management feature in the IPMI connection has been activated. An automatic fallback to the PDU ports occurs if IPMI is unreachable.
PiKVM Devices
The IPMI and console implementation of PiKVM is supported by Tenantos. To add a PiKVM, just enable the IPMI BMC at PiKVM and add an IPMI connection assignment as usual. Afterward, the power state of the server can be managed.
To make the NoVNC console work, the VNC server of PiKVM must be activated. The VNC credentials must be the same as for IPMI. Please refer to the PiKVM documentation for instructions on how to enable the VNC server.
Alternatively, you can use the PiKVM API-compatible Devices connection type, which uses the API for power control and provides access to the HTML5 console.
PiKVM API-compatible Devices
PiKVM API-compatible devices (such as PiKVM itself or Glinet Comet KVM) are supported and can be used for power control and remote console access.
Important: Most PiKVM API-compatible devices do not support removing admin tools from the web interface via system configuration. To address this limitation, Tenantos provides the "Console: Admin Tools Visibility" setting with the following options:
- Hide tools for non-admins only
- Hide tools for all users
- Always show tools
This option hides the tools using browser-side filtering. Be aware that experienced users may bypass this method. For stricter access control, the web interface on the device must be modified directly.
Note: Filtering is implemented in a generic manner, but the filtering mechanism may not work with all PiKVM derivatives, as device-specific support is required. If filtering does not work, please submit a Device Integration Request.
NanoKVM
NanoKVM can be used for power control and remote console access.
Important: NanoKVM does not support removing admin tools from the web interface via system configuration. To address this limitation, Tenantos provides the "Console: Admin Tools Visibility" setting with the following options:
- Hide tools for non-admins only
- Hide tools for all users
- Always show tools
This option hides the tools using browser-side filtering. Be aware that experienced users may bypass this method. For stricter access control, the web interface on the NanoKVM must be modified directly.
Cisco UCS
Cisco UCS blade servers can be integrated with Tenantos in two ways. Both paths are supported - choose whichever fits your setup.
In both cases, the remote console is opened inside the NoVNC Docker container. Tenantos handles the UCSM token exchange in the backend, so UCSM credentials are never exposed to the user.
Dedicated Cisco UCS connection
The dedicated Cisco UCS connection talks to UCS Manager (UCSM) running on the Fabric Interconnect for both power management (via the UCSM API) and remote console access.
The following fields are required:
- Fabric Interconnect IP / Hostname - the IP or hostname of UCS Manager.
- Username and password - credentials of a UCS Manager user with permissions for the blade.
- Blade DN - the distinguished name of the blade server, e.g.
sys/chassis-1/blade-3.
Via an IPMI connection
UCS-managed blades also expose an IPMI service through UCS Manager. If you already have IPMI connection assignments for your servers, you can set their "Web BMC Provider" to "Cisco UCS (via Fabric Interconnect)". In this mode:
- Power management runs over standard IPMI against the IP entered in the connection.
- The remote console is requested from UCS Manager - Tenantos retrieves the KVM URL via UCSM and opens it inside the NoVNC container, as described above.
This way a single IPMI connection covers both power control and console access on UCS-managed servers, removing the need to add a separate Cisco UCS connection.
Generic Web Browser Console
The Generic Web Browser Console allows access to any web-based management interface through Tenantos. This connection type opens the specified domain or IP address in an isolated Docker container and provides access via NoVNC.
If a username and password are defined in the connection settings, Tenantos will attempt to log in automatically when a login form is detected.
Proxmox / VMware
You must first add access to the virtualization platform so that you can assign such a connection. For more information, please read below.
External Providers (OVH, etc.)
To assign an external provider, you need to add the API credentials. Follow these steps:
- Navigate to the "External Providers" page.
- Add the API credentials for the external provider.
For more information, please read the "Manage External Providers" page.
Once the external provider has been added, you can add a connection to the servers:
- Open the server detail page.
- Click on "Configuration" in the navigation menu.
- Click on the "Add Connection" button and select the provider you want to add.
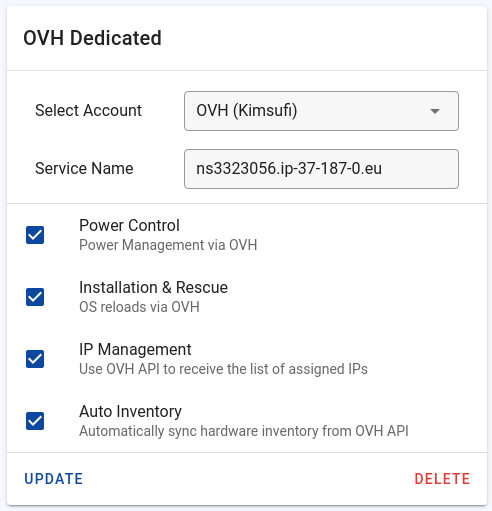
- In the dialog that appears, select the account you added, fill out the form, and enable any desired features such as power control.
For most external providers, you only need to enter the server ID of the other side. The following explains how to find out the server ID.
Proxmox
The "KVM Server ID" is the VM ID which you can find after you have logged in at the Proxmox panel.
2000 (the-hostname.com) - the VM ID is 2000.
Backup & Snapshot Features
Proxmox connections support backup and snapshot functionality. You can configure limits, storage locations, and default settings directly on the connection assignment.
Storage Configuration
Storage names must be entered manually exactly as they appear in Proxmox (e.g., local-zfs, backup-storage). This differs from VPS plan configuration where storages are selected from available options.
Leave empty to allow all storages.
Available Settings
Configure backup limits, snapshot limits, default backup modes, compression methods, and memory inclusion for snapshots. When servers are created from VPS plans, these settings are inherited but can be modified individually per connection.
VMware
ESXi
To find the "VM ID" value in VMware ESXi, log in to the ESXi panel and open the detail page of the virtual server you want to add to Tenantos. The VM ID can be found in the URL, as shown in the following example:
https://vmware/ui/#/host/vms/85 - the VM ID is 85.
vSphere
To find the "VM ID" value in VMware vSphere, log in to the vSphere panel and open the detail page of the virtual server you want to add to Tenantos. The VM ID can be found in the URL, as shown in the following example:
https://vmware/ui/app/vm;nav=h/urn:vmomi:VirtualMachine:vm-3038:f3342ccb-2609-4118-8e98-986caa15e3dc/summary - the VM ID is "vm-3038"
OVH
To locate the server ID at OVH, refer to the service name on this page. The service name will typically be in a format like ns1111111.ip-37-180-0.eu.
Hetzner Dedicated
To locate the server ID at Hetzner, refer to the ID on this page. When inserting the ID, do not include the "#" symbol. For example:
EX42-NVMe #1234567 - the server ID is 1234567.
Hetzner Cloud
To locate the Server ID for a cloud server at Hetzner, refer to the URL when you open the server in the Hetzner console. For example:
https://console.hetzner.cloud/projects/111111/servers/1234567/overview - the server ID is 1234567.
MyLoc
To locate the Server ID at MyLoc, log in to customer-interface.com. The Server ID is a numeric value that will be visible once you are logged in.
NovoServe
The Server ID is in the format "123-123".
InterServer
To locate the Server ID at InterServer, open the server details page in the client area. The Server ID is located below the "Order Info".
Tailor Made Servers
The Server ID is contained in the URL of the server information page.
Hostkey
Tenantos
The Server ID is contained in the URL of the server detail page.
https://tenantos-domain/servers/1234567 - the server ID is 1234567.
Screenshots