Migrate from NOC-PS to Tenantos
Free Migration Service
We will be happy to perform the migration for you free of charge. Simply reach out to our support team.
A CLI tool is available to import the data from NOC-PS to Tenantos to make it easy for NOC-PS customers to switch to Tenantos.
Migratable Entries
The following entries can be migrated:
- Servers
- Hostname
- Primary IP assignment
- IPMI details
- Switch connection
- Description
- Installed OS name
- Permanent DHCP lease setting
- IPv4 and IPv6 subnets
- SNMP switches
Excluding the items listed above, all other elements cannot be migrated, including but not limited to:
- Additional IP assignments, IPv6 assignments
- Other devices or connection assignments than SNMP switches (e.g. PDU or Proxmox)
If you need to import more than 300 servers and need support for one of the non-migratable entries, please get in touch with our support team.
Notes
The migration process checks for existing servers, subnets, and switches in Tenantos. If the item already exists, it will not be transferred. This makes the migration script useful even if some items already exist in Tenantos.
The migration is split into multiple steps, allowing you to preview the data to be transferred and exclude specific steps. For instance, you can choose to import servers while excluding IPv6 subnets.
Before beginning the migration, ensure that you have increased your license limit. If the number of servers exceeds your current limit, the import will fail with an error message. You can start the import again after the required amount of servers have been booked.
How to migrate
Create a backup of the Tenantos database
Export the NOC-PS database
Due to limitations of the NOC-PS API, it is required to copy the database. Here's how:
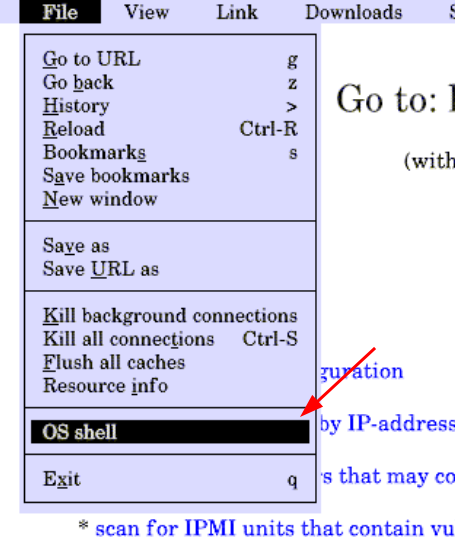
- Connect to the NOC-PS server through a console (e.g. VNC, IPMI).
- Press Esc, then Down. This will open the "File" menu. Navigate down to the
OS shelloption and press enter. [SCREENSHOT] - If the screen output appears odd, type "clear" and press enter.
- Run the command
pg_dump -U postgres noc-ps > dbdump.
After the database dump is created, you will need to retrieve the file. This can be done either by starting the SSH server or by moving the dump to the public HTML directory using the command mv dbdump /usr/minx/public_html.
Please note that the latter option is not secure. If you choose this method, ensure to change the filename to something difficult to guess, and delete the dump from the NOC-PS server immediately after downloading it.
Import the database to Tenantos
To make the database accessible in Tenantos, you need to import it. First, upload the created dump (e.g. via rsync, wget) to the Tenantos server into the directory /var/www.
Then execute the following command:
docker run -p 127.0.0.1:5432:5432 --name=nocps -d -e POSTGRES_USER=postgres -e POSTGRES_PASSWORD=postgres -e POSTGRES_DB=nocps library/postgres
These commands will install a PostgreSQL Docker container which is used to import the NOC-PS database. The Docker container is only locally reachable.
To import the database, execute the following commands:
cd /var/www
cat DUMP-FILENAME | docker exec -i nocps psql -U postgres nocps
Replace DUMP-FILENAME with the filename of the backup.
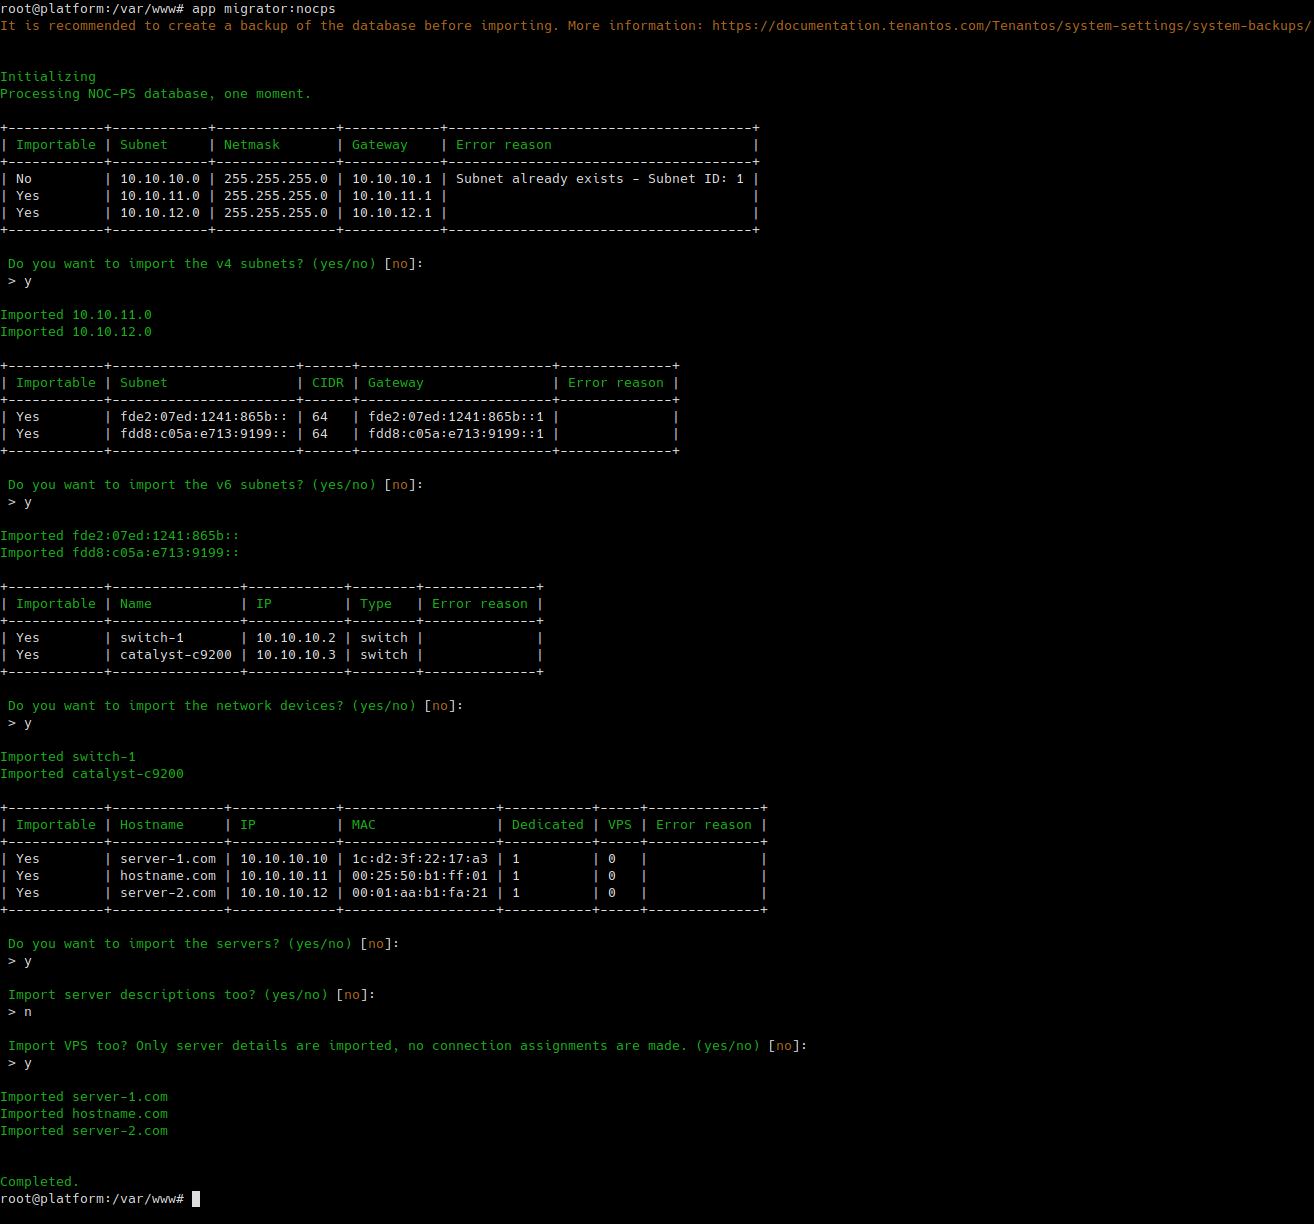
Execute the migration script
To begin the migration process, enter the command app migrator:nocps and follow the steps. When prompted to include server descriptions, keep in mind that NOC-PS descriptions may be lengthy. It's recommended to only import them if necessary.
After migration
After the migration, log in to the Tenantos web interface to verify the results. Ensure that Tenantos is able to establish a connection to the imported network switches and ensure that IPMI is reachable. You can determine the success of the IPMI connection by waiting a few minutes and observing the power status of the imported servers displayed in the server table.
Then you can delete the NOC-PS backup file and the Docker container to remove any remaining artifacts:
docker stop nocps
docker rm nocps
docker rmi library/postgres
# rm /path/to/noc-ps-backup
If you face any problems, please contact our support.
Screenshots