Proxmox Template Installations
For Proxmox VPS, two options are available for reinstallations:
- Installation via PXE
- Installation via OS Templates
This page describes installations via OS templates. Cloning a prepared template is significantly faster than a PXE deployment.
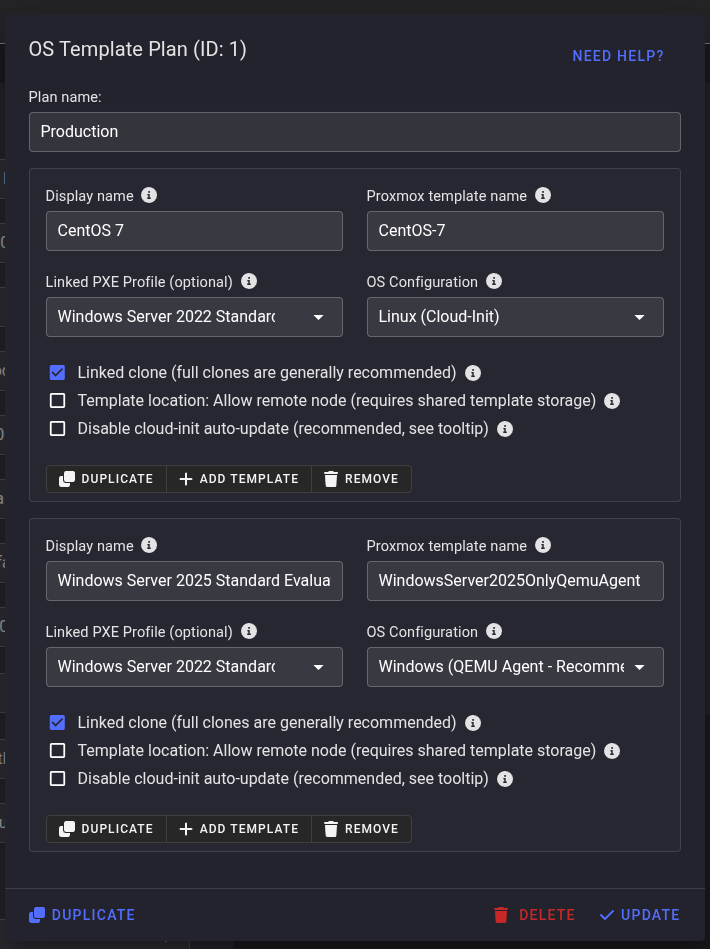
OS Template Plans
OS template plans define which templates are available for VPS installations and how each template behaves. These plans are assigned to VPS plans. When a VPS is provisioned, the assigned template plan ID is stored in the Proxmox connection details. This allows specific templates to be offered only to specific VPS plans or virtual servers. The assigned plan can later be changed in the server's Proxmox connection settings.
Template-based installations support first boot scripts, post-install callbacks, and can be linked to PXE profiles for advanced workflows.
To create or manage OS template plans, open "Virtualization" → "VPS Plans", edit a VPS plan, and use the "OS Template Plan" option to assign or create plans.
Display Name
The OS name shown on the reinstallation page.
Recommended format: OS name version (for example: Ubuntu 24.04, CloudLinux 9).
Using identical display names as your PXE profiles is recommended. This way billing integrations like WHMCS only need to maintain one set of operating system names instead of separate configurations for PXE and template-based installations.
Template Name
The exact Proxmox template name as shown in the Proxmox VE web interface.
Allow Remote Node
Enable this option when the template resides on shared storage and may be located on a different node. Tenantos still prefers templates on the local node but can fall back to shared-storage templates when this option is enabled. Disable it when each node maintains its own dedicated copy.
Linked Clone
Determines whether Tenantos creates a linked or full clone.
- Linked clone - Fast and storage efficient, but the VM stays tied to the template's datastore and the template must remain available. No VM migrations are possible.
- Full clone (recommended) - Creates an independent VM that can later be moved to a different storage or node.
Disable cloud-init Auto Update
Prevents cloud-init from running package upgrades during deployment. This is useful when a linked PXE profile already performs system updates through scripts.
Works with Proxmox VE 8.0 and newer. If the Proxmox node is running an older version, this option is ignored.
OS Configuration Type
Defines how Tenantos configures the guest after cloning.
- Linux (cloud-init) - Standard choice for Linux templates. Both cloud-init and the QEMU guest agent must be installed.
- Windows (cloud-init) - Uses cloud-init, only works reliably on Proxmox VE 8.2.4 and newer. Older versions require community patches (further information can be found in the Proxmox forum). Both cloud-init (usually Cloudbase-Init) and the QEMU guest agent must be installed.
- Windows (QEMU Agent - recommended) - Relies on the QEMU guest agent to configure Windows (hostname, networking, password, disk expansion, trial rearm for evaluation builds, etc.). Only the guest agent must be installed in the template. Tenantos automatically executes additional steps for you (such as trial rearm, disk expansion, and password complexity configuration), making this much simpler than cloud-init.
For all options, the QEMU guest agent must be installed and configured to start automatically on boot within the template, with guest-exec commands allowed. If you are using an existing template that does not have cloud-init or the QEMU guest agent installed, please follow the steps described here.
Linked PXE Profile
Each template can optionally inherit a PXE profile. Linked templates adopt that profile's restrictions (tags, roles, allowed locations), customer-facing options (hostname, SSH keys, password fields), first boot scripts, and the "installation completed" trigger behaviour. Scripts are executed after the VM boots.
OS Configuration
During a template-based installation, Tenantos replaces the existing VM with a clone of the selected template while restoring the VPS resources such as CPU and memory configuration afterwards.
Installation Flow
- Create a snapshot of the current VM configuration (CPU, memory, NUMA, devices, hotplug, etc) and save a firewall snapshot including rules, aliases, and IP sets.
- Clone the selected template to the original VMID.
- Restore the saved configuration so CPU, memory, storage assignments, display settings, and other VM options match the server's state before the reinstall. Template-specific values such as BIOS, machine type, and OS type are inherited from the template.
- Recreate additional disks exactly as they existed before, resize the primary disk to its previous size, and add or remove the cloud-init disk depending on the selected OS configuration type.
- Apply built-in safeguards to automatically correct common configuration issues, such as enabling the QEMU guest agent flag, adding a missing cloud-init disk, or repairing an unconfigured boot order.
- Power on the VM, apply the operating system configuration based on the selected OS configuration type, and execute both linked and user-defined scripts once the guest is running.
- Mark the installation as completed immediately or after a callback, depending on the PXE profile settings.
Preserved Configuration
Tenantos re-applies the values that were present on the server before the reinstall, including:
- CPU topology, memory size, ballooning, hotplug, additional devices, HA preferences, etc.
- Network interfaces, MAC addresses, IPv4 and IPv6 assignments, and per-interface firewall behaviour such as the IP spoof filter.
- Firewall rules, aliases, IP sets.
Certain items deliberately remain controlled by the template (for example BIOS type, machine type, and OS type) to avoid compatibility issues.
Disk Handling
The content of ALL disks is deleted. Data of additional disks are NOT preserved.
Disks are reconstructed from the saved configuration:
- The primary disk is resized to its previous capacity on the previous storage. Disk settings of the primary disk (e.g., cache mode, discard, ...) are inherited from the template and are not restored.
- Additional disks are recreated with their original size, storage, cache, and format, and EFI or TPM disks are recreated when required.
- cloud-init disks are added automatically when the OS configuration type needs them and removed otherwise.
Installation Completion
Tenantos uses two completion modes depending on the OS configuration type and linked PXE profile configuration:
Template Mode (Immediate Completion): The installation is marked as completed immediately after the VM boots. This is the default behavior when no PXE profile is linked or when no scripts are executed after the first boot.
Callback Mode (Deferred Completion): The VM reports back to Tenantos after all configuration steps and scripts have finished executing. The installation is marked as completed only after receiving this callback. The exact timing of the callback depends on the PXE profile's completion trigger setting.
Callback mode is used when:
- A PXE profile with user-defined scripts is linked (Linux cloud-init and Windows cloud-init)
- Windows QEMU Agent configuration is selected (always uses callback mode, regardless of PXE profile configuration)
Linux (cloud-init)
Tenantos writes the hostname, SSH keys, generated root password, IPv4/IPv6 configuration, and DNS resolvers into cloud-init metadata. If cloud-init auto-update is enabled (or not explicitly disabled), cloud-init handles package upgrades. Scripts run after the first boot.
Since some official cloud images disable root logins, Tenantos automatically ensures that the SSH server accepts root logins. So if the template does not support root logins, Tenantos will enable it. If you don't want that, you can attach a first-boot script that disables root logins.
The QEMU guest agent must still be installed and configured to start on boot.
Windows (QEMU Agent)
This method avoids cloud-init entirely and relies on the QEMU guest agent:
- The Administrator password is set.
- IPv4/IPv6 settings, DNS resolvers, hostname, and optional interface resets are applied automatically.
- The primary disk is expanded, and evaluation builds receive a trial rearm so the licence period is reset.
- Linked or selected scripts are executed.
- Temporary files and Windows event logs are cleared.
This is the recommended method for Windows template installations. It is easier to maintain and works across all modern Windows versions.
Windows (cloud-init)
Requires a template prepared with cloud-init (e.g., Cloudbase-Init), sysprepped, and compatible with Proxmox's cloud-init integration. The QEMU guest agent must also be installed and configured to start on boot.
Windows cloud-init support requires Proxmox VE 8.2.4 or newer. Earlier versions may need community patches (further information can be found in the Proxmox forum) and may not work in all environments.
For more details, refer to the Proxmox Wiki.
IPv6-only VMs
Template-based installations support IPv6-only OS installations, making IPv4 optional. To install an OS on an IPv6-only VM, the following requirements must be met:
- The Tenantos local agent must be reachable over IPv6 to receive callbacks.
- An AAAA record must be configured for the local agent domain.
This requirement applies only to the local agent. The main Tenantos domain, which provides the web interface, may continue to be reachable over IPv4 only.
Creating Templates
Tenantos does not provide pre-built templates. You must build your own KVM templates.
Helpful Proxmox resources:
For Linux, you can usually use the official cloud images provided by distributions (such as Ubuntu Cloud Images, Debian Cloud Images, or Rocky Linux Cloud Images). These images come pre-configured with cloud-init.
However, the official cloud images often do not include the QEMU guest agent. You can install and enable the guest agent and cloud-init by running the following command on your Proxmox host:
cd /var/lib/vz/images/VMID
virt-customize -a image.raw \
  --install cloud-init,qemu-guest-agent \
  --run-command 'systemctl enable qemu-guest-agent' \
  --run-command 'cloud-init clean' \
  --run-command 'rm -f /etc/cloud/cloud-init.disabled' \
  --run-command 'truncate -s 0 /etc/machine-id' \
  --run-command 'rm -f /var/lib/dbus/machine-id' \
  --run-command 'ln -s /etc/machine-id /var/lib/dbus/machine-id || true'
Replace VMID with the ID of the template VM and image.raw with the actual disk image filename.
If virt-customize is not available at your Proxmox server, the package libguestfs-tools must be installed first (apt install libguestfs-tools).
If networking does not work when executing virt-customize, refer to this Proxmox forum thread.
How to Switch Existing VMs from PXE to Templates
Once an OS template plan has been created, its plan ID can be added to the Proxmox connection of the respective server. The OS template plan ID is displayed in the VPS plan dropdown and when editing an OS template plan.
- Add the plan ID under "OS Template Plan ID" and enable "OS Installation" in the Proxmox connection.
- Click "Update" in the Proxmox connection.
- Remove the PXE connection assignment and, optionally, the DHCP assignment.
Bulk Updating
The app servers:updateServerConnections tool is interactive and provides a preview of all affected servers before applying changes.
To update multiple servers at once and switch from PXE-based to template-based installations, use the app servers:updateServerConnections CLI tool.
- Log in via SSH to your Tenantos server.
- Run the following command to view all available options:
app servers:updateServerConnections
Example
Update all Proxmox VPS to assign the OS template plan ID 1 and remove both the DHCP and PXE connections:
app servers:updateServerConnections --connectionType=proxmox --field=osTemplatePlanId --value=1 --alsoRemoveConnections=pxe,dhcp
Troubleshooting
Installation Does Not Complete
If the installation hangs and never reaches the completion step, it is usually caused by one of the following issues. Start by checking the VM status in Proxmox (is the VM running? Is the VM installed?) and then check the installation logs in /var/www/html/storage/logs/.
Checking Tenantos Logs: Installation logs are stored in /var/www/html/storage/logs/. These logs contain detailed information about each step of the installation process and can help identify where the installation failed.
Checking Activity Log: Tenantos also records critical errors and warnings in the Activity Log. However, these messages are also written to the text logs (see point 1).
Checking the VM Logs: If the VM is running, check the QEMU-related logs inside the guest system (/var/log/messages or /var/log/syslog). These logs might reveal issues with the QEMU guest agent (for example, guest-exec command denials) or SELinux-related problems, if SELinux is enabled.
Template Configuration Issue: The template may not be properly configured for the selected OS configuration type. For example, a Linux/Windows cloud-init installation requires cloud-init to be installed and properly configured in the template. In all cases, the QEMU guest agent must also be installed and configured to start on boot.
Callback Issue: When using callback mode, the VM may be unable to report back to Tenantos. This can occur if first boot scripts fail, the QEMU guest agent is not responding, or network connectivity issues prevent the callback from reaching Tenantos. In addition to checking the QEMU logs inside of the installed VM (/var/log/messages, /var/log/syslog), also check the log files in /var/www/agent/storage/logs on your Tenantos main server for callback errors to verify that the local agent can communicate with the main installation.
Forceful Cancellation: Template-based installations cannot normally be canceled. However, administrators have access to the "Forcefully cancel installation" option in the installation status dialog. This option marks the installation as completed in the database only and should be used when an installation is stuck or has encountered a problem. This option is available to administrators only, is not visible to regular users, and is useful for testing purposes.
Installation takes too long
If the installation appears to take longer than expected, this is usually because updates are being installed during the first boot or first boot scripts are being executed.
When no PXE profile is linked, template-based installations complete immediately after the VM boots. However, if a PXE profile is linked to the template, the installation runs in callback mode. In this mode, the installation is only marked as completed all scripts have finished executing. The exact timing depends on the PXE profile's "Mark installation as completed" event configuration.
During this process, cloud-init may perform package upgrades (unless explicitly disabled in the template plan), and any first boot scripts defined in the linked PXE profile will be executed. These operations can take some time depending on the number of updates and the complexity of the attached scripts.
If the installation takes too long to be marked as complete, adjust the "Mark installation as completed event" option in the linked PXE profile. Note that this also affects PXE-based installations, so you may want to create a separate PXE profile specifically for VMs and link that profile to your VM templates.
Further information is available here
Template Generator Script
This troubleshooting guide refers to the Template Generator Script.
"virt-customize: error: no operating systems were found in the guest image"
If the image does contain an operating system, this error usually occurs due to unsupported filesystem features or flags - most commonly related to XFS filesystems.
Older versions of the libguestfs tools included in Proxmox may not support newer XFS feature flags used by modern Linux distributions.
To confirm this, execute the virt-customize command shown in the script output. The command output will typically show kernel-level mount errors, such as:
check_for_filesystem_on: /dev/sda3 (xfs)
command: mount '-o' 'ro' '/dev/sda3' '/sysroot//'
[    2.893301] SGI XFS with ACLs, security attributes, realtime, quota, no debug enabled
[    2.895564] XFS (sda3): Superblock has unknown incompatible features (0x20) enabled.
[    2.896369] XFS (sda3): Filesystem cannot be safely mounted by this kernel.
[    2.897104] XFS (sda3): SB validate failed with error -22.
command: mount returned 32
command: mount: stderr:
mount: /sysroot: wrong fs type, bad option, bad superblock on /dev/sda3, missing codepage or helper program, or other error.
check_for_filesystem_on: /dev/sda4 (xfs)
command: mount '-o' 'ro' '/dev/sda4' '/sysroot//'
[    2.909305] XFS (sda4): Superblock has unknown incompatible features (0x20) enabled.
[    2.910240] XFS (sda4): Filesystem cannot be safely mounted by this kernel.
[    2.910958] XFS (sda4): SB validate failed with error -22.
command: mount returned 32
command: mount: stderr:
mount: /sysroot: wrong fs type, bad option, bad superblock on /dev/sda4, missing codepage or helper program, or other error.
inspect_os: fses:
fs: /dev/sda2 (vfat) role: other
inspect_get_roots: roots:
guestfsd: => inspect_os (0x1e0) took 0.90 secs
libguestfs: trace: inspect_os = []
virt-customize: error: no operating systems were found in the guest image
This indicates that the XFS filesystem on the image uses features not supported by the kernel and libguestfs version available in your Proxmox environment. Therefore virt-customize fails to mount the image and cannot detect the operating system.
Run the Template Generator Script on a newer version of Proxmox, which includes updated kernel and libguestfs packages.
SSH: "client_loop: send disconnect: Broken pipe" / Terminal: "root: no shell: Permission denied"
See: Red Hat Bugzilla #1554735
This issue occurs when SELinux is enabled and package updates are applied during template generation. To avoid this, either disable package updates when generating the template, set SELinux to permissive mode, or disable SELinux entirely.
Note that when SELinux is enforced, the templates may need to be adjusted to function properly. The generator script takes care of some SELinux-related configurations, but it is up to the client (you) to handle all SELinux aspects if it is chosen to be enabled.
Screenshots