Failed PXE Installations
Although the article is lengthy, it is highly recommended to read it completely as it provides detailed explanations of all common PXE issues and their corresponding solutions.
Issues with PXE booting or DHCP are not related to Tenantos but are network-related issues.
Installation failed because of network connectivity issues
Typical error messages
This only affects dedicated servers. PXE installations for virtual servers are usually not affected.
- no response after x secs - giving up
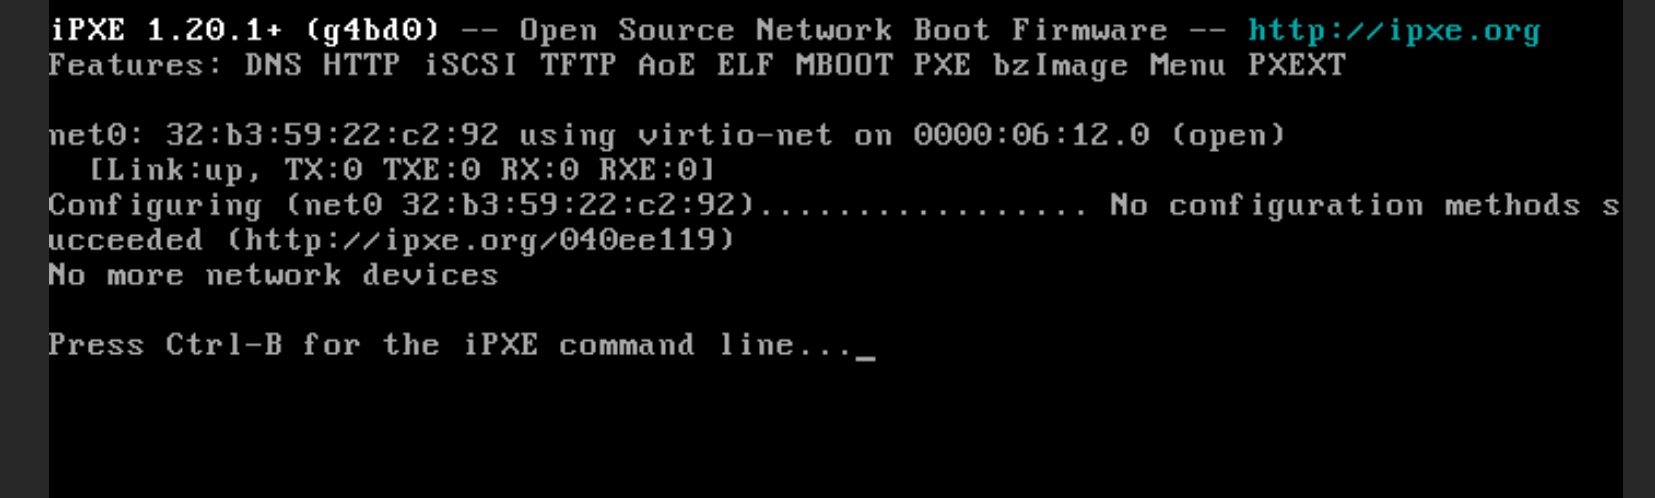
- No configuration methods succeeded (http://ipxe.org/040ee119) [Screenshot]
- Failed to retrieve the preconfiguration file [Screenshot]
- TFTP open timeout
- Media test failure, check cable
- Connection timed out (https://ipxe.org/4c116035)
Symptoms
In most cases, the server can obtain an IP from the DHCP server during PXE boot, but re-requesting the IP address fails either during iPXE chainloading or within the OS installer.
The problem mostly occurs on Debian installations, because the Debian-Installer expects a fast IP address assignment. Anaconda-based installations (e.g. CentOS), on the other hand, usually work, although even that must not be the case if PXE chainloading already fails.
Installation Statuses
Installation Hangs at "Preparing boot environment"
If the installation process hangs at "Preparing boot environment", the server either did not receive an IP address from the DHCP server or failed to download the initial PXE file.
- No DHCP lease received? Refer to this section.
- iPXE fails to download files via HTTP? Refer to this section.
Installation Hangs at "Installing operating system"
If the installation remains at "Installing operating system", always check the server console first to determine whether the operating system installation is still in progress, has failed, or has already completed.
In some cases, the installation may have finished successfully, but the callback that marks it as completed could not be sent. If the server has already booted into the operating system, refer to this section for further steps.
Possible causes
The issue is nearly always tied to either a failure in network connectivity or a misconfiguration of the switch. We try to increase the default timeouts if technically possible, but if the network is not configured optimally, problems may still occur.
The most common cause for issues like these is that the interface is in a blocking state due to STP.
- If, during the PXE boot process, the server successfully obtains an IP address via DHCP, but then encounters a failure when chainloading a newer iPXE version (i.e., the PXE process restarts and fails to renew the IP request via DHCP), this is usually indicative of a problem with the STP configuration.
- If the server receives an IP address via DHCP during PXE boot, but the process times out during the HTTP data download, this scenario also often points to potential issues with the STP configuration.
The following article delves into all common causes and provides further information about the STP below.
No DHCP lease received
If no DHCP lease has been received, a network-related issue is likely. Please verify the following:
- If multiple VLANs are used, ensure that a DHCP relay has been configured or an additional remote agent has been installed in the VLAN.
- Verify that your network satisfies the DHCP requirements and no firewall is blocking DHCP packets. For example, a firewall configuration may exist to block rogue DHCP servers.
- Verify that the DHCP server is running by executing
ps aux | grep dhcpd. This command must be executed on the agent assigned as a DHCP server for the server in Tenantos. Keep in mind that depending on the configuration, the DHCP server may only be running during a server reinstall.
After these points have been checked, further troubleshooting proceeds much like any other network problem, and a network administrator should be able to identify the cause. For completeness, some technical points and potential troubleshooting paths are explained:
The DHCP logs can be located on the respective agent or Tenantos server in the file /var/log/syslog. The first step is to initiate a new installation and monitor the logs by executing tail -f /var/log/syslog to check if DHCP requests are being received. A successful DHCP lease looks like this:
Jun 19 12:25:16 platform dhcpd[743083]: DHCPDISCOVER from 32:b3:59:22:c2:92 via ens19
Jun 19 12:25:16 platform dhcpd[743083]: DHCPOFFER on 10.10.10.60 to 32:b3:59:22:c2:92 via ens19
Jun 19 12:25:19 platform dhcpd[743083]: DHCPREQUEST for 10.10.10.60 (10.10.10.13) from 32:b3:59:22:c2:92 via ens19
Jun 19 12:25:19 platform dhcpd[743083]: DHCPACK on 10.10.10.60 to 32:b3:59:22:c2:92 via ens19
Log entries like "network tenantos: no free leases" are normal and can be ignored.
-
If the "DHCPDISCOVER" line is not visible, the server is not receiving a DHCP request. If this line is missing, the standard procedure is to use a packet capture tool like tcpdump to investigate where the DHCP packets are ending up in the network. As example:
tcpdump -i eth0 port 67 or port 68 -envv -
If a DHCP request comes in but "DHCPNAK" appears in the logs, it means that another DHCP server exists in the network, which has given a lease for the MAC of the server that's being installed.
-
If not all four log lines (DHCPDISCOVER, DHCPOFFER, DHCPREQUEST, and DHCPACK) are present, it means that the DHCP handshake hasn't been completed. If only the DHCPDISCOVER and DHCPOFFER lines are visible, it means that the agent successfully offered a DHCP lease, but the acknowledgment packets didn't reach back to the requesting server. This is often due to issues with the DHCP relay or firewall configuration.
Troubleshooting using tcpdump
As mentioned earlier, tcpdump is a useful tool for troubleshooting DHCP issues. This process involves performing a PXE boot while simultaneously running tcpdump (refer to the command mentioned above) on the assigned Tenantos agent.
- If you see DHCP traffic, ensure that the packets are from the server undergoing PXE boot. This can be determined from the "Client Ethernet Address" field. Other DHCP traffic may be present, but is not relevant for troubleshooting.
- If only DHCPDISCOVER packets are seen for the MAC address of the server without a DHCPOFFER response, verify that the "Gateway IP" value matches with the gateway of the assigned primary IP. If the "Gateway IP" does not match, add a subnet that includes the IP from the "Gateway IP" field. The need for this step depends on the specific network configuration.
- If the DHCP server sends a DHCPOFFER packet following the DHCPDISCOVER, but no DHCPREQUEST is received, this could indicate that a firewall or network configuration is either discarding or mishandling the packets.
- If you do not see any DHCP traffic, it means no DHCP traffic is reaching the agent. This is a firewall or network configuration problem.
Media test failure, check cable
If you encounter the "Media test failure, check cable" error message, it usually means that the NIC currently being used for PXE booting is not connected to the network.
To fix the issue, access the server's BIOS and enable PXE boot for the appropriate network card.
PXE boot hangs at "Start PXE over IPv4 on MAC:" / "TFTP open timeout"
When encountering the message "Start PXE over IPv4 on MAC:" and the PXE boot process does not proceed, the initial step should be to check if the server has obtained a DHCP lease. If so, the problem often lies with either the STP configuration or an unreachable TFTP server.
For the "TFTP open timeout" message, the server already received a DHCP lease and there is no need to verify that the server has received a DHCP lease. The issue typically relates to either STP configuration problems or an inaccessible TFTP server.
The TFTP address is the IP address of the assigned PXE agent. The cause of the issue might be:
- TFTP service being inaccessible due to firewall rules or ACL configurations on a switch/router. If you have virtualized the agent, the hypervisor could block the TFTP port as well.
- An incorrect IP address has been specified on the remote agent page in Tenantos.
To PXE boot servers, the server must be able to establish a connection with the specified agent IP. This connectivity can be tested as follows:
:~$ tftp AGENT_IP
tftp> get snponly.efi
Transfer timed out.
This test must be executed from a server other than the agent, as otherwise the test would bypass the network. Ideally, the affected server is booted into a rescue system via an ISO and the test is executed from there.
Should the output be "Transfer timed out", typically a firewall is blocking the TFTP traffic.
STP Configuration (Cisco: PortFast)
A common cause is the STP configuration on the side of the switch. If you don't use RSTP (or adequate protocols like MSTP), the network traffic to the server's interface will be blocked for up to 50 seconds when the interface comes up. This is too long for some installers and a timeout occurs.
Each switch manufacturer describes in its documentation how to enable RSTP. If STP is currently used and everything works, we still recommend switching to RSTP (or a similar protocol) as this will result in faster PXE boots and most switch vendors advise the same.
Juniper Networks has an excellent article explaining the benefits of RSTP, you can find the article here.
Please note that RSTP should only be enabled for edge ports. Edge ports are ports that connect an end device. For example, if the cable from interface ge-0/0/1 is plugged into a server, it is an edge port.
Click to view additional information.
Also click if you still have issues, even after activating RSTP.
Sometimes it is assumed that a correct STP configuration is in place. However, when troubleshooting the issue, it often becomes apparent that this is not the case. In addition to checking the logs on the switch to verify that the server's interface is not in a blocking state, you can manually check how long it takes for an IP address to become accessible once it has been brought up:
- Boot the server into a rescue system such as grml. This can be achieved in several ways: By trying to start grml via PXE, manually mounting the ISO through your PC, or using Tenantos's ISO functionality to mount the grml ISO via the NoVNC console.
- After the server has booted, enter the
ifconfigcommand to determine the name of the interface. Then, take down the interface usingifconfig <name> downand wait for up to 1 minute. - From your PC, start pinging the server IP by executing
ping <server-ip> - Manually bring up the IP address on the server. This can be done by executing
ifconfig <name> <ip>/<cidr> up; route add default gw <gateway-ip>(e.g.ifconfig ens18 10.10.10.2/24 up; route add default gw 10.10.10.1). - Begin counting the time it takes for the IP to respond to pings.
If it takes longer than a few seconds for the IP to become pingable, it is likely that the issue lies with the STP configuration. Although other causes will be discussed further in this article, it is impossible to list every single cause. However, a network administrator should be able to identify and solve the issue.
protocols {
    rstp {
        interface ge-0/0/1.0 {
            edge;
        }
    }
}
interface Ethernet2
spanning-tree portfast
Slow port speed auto-negotiation
This is rather rare, but the network timeout may also be related to a slow port speed auto-negotiation. If the STP mode has already been changed and the problem persists, switching to a fixed port speed might solve the problem.
LACP Configuration
If you have configured LACP for the affected server on the switch, it is important to also configure LACP fallback. This is because during PXE boot, no BPDU packets can be transmitted. BPDUs are used to exchange information between switches in a network using STP. Without BPDUs, the switch cannot determine the topology of the network and may not allow traffic to flow through the ports.
To establish network connectivity, LACP fallback must be configured. The specific steps for configuring LACP fallback do vary depending on the manufacturer and model of the switch. Please consult the documentation provided by the manufacturer for detailed instructions.
iPXE Fails to Download Files via HTTP / Dots Appear During iPXE Boot
This issue typically indicates a connectivity problem, either between the Tenantos agent and the OS mirrors or between the agent and the PXE-booted server. The problem can manifest in two ways:
- Slow Download: The file download is very slow. The installation might succeed if you try again later, as the agent continues to download files in the background and caches them for future attempts.
- Connection Issues: The download fails completely due to issues like a connection timeout or an MTU mismatch on the network.
Please read this section to learn how to troubleshoot download issues.
Troubleshooting Download Issues
To diagnose download issues, check the agent logs located in the /var/www/agent/storage/logs directory. The logs will show the file download process, including cache hits and misses.
A typical log entry looks like this:
[2024-07-05 17:28:01] production.INFO: PXE (va4TutvRw3lEb7): Serving file: /var/www/storage/tmp/centos7/Packages/kexec-tools-2.0.15-51.el7.x86_64.rpm
[2024-07-05 17:28:01] production.INFO: PXE (va4TutvRw3lEb7): Requested file: /var/www/storage/tmp/centos7/Packages/keyutils-libs-1.5.8-3.el7.x86_64.rpm
[2024-07-05 17:28:01] production.INFO: PXE (va4TutvRw3lEb7): File is not in cache, downloading: /var/www/storage/tmp/centos7/Packages/keyutils-libs-1.5.8-3.el7.x86_64.rpm from https://archive.kernel.org/centos/7.9.2009/os/x86_64/Packages/keyutils-libs-1.5.8-3.el7.x86_64.rpm
[2024-07-05 17:28:01] production.INFO: PXE (va4TutvRw3lEb7): Serving file: /var/www/storage/tmp/centos7/Packages/keyutils-libs-1.5.8-3.el7.x86_64.rpm
[2024-07-05 17:28:01] production.INFO: PXE (va4TutvRw3lEb7): Requested file: /var/www/storage/tmp/centos7/Packages/pciutils-libs-3.5.1-3.el7.x86_64.rpm
[2024-07-05 17:28:01] production.INFO: PXE (va4TutvRw3lEb7): File is not in cache, downloading: /var/www/storage/tmp/centos7/Packages/pciutils-libs-3.5.1-3.el7.x86_64.rpm from https://archive.kernel.org/centos/7.9.2009/os/x86_64/Packages/pciutils-libs-3.5.1-3.el7.x86_64.rp
To find logs relevant to a specific installation, you can search for the installation ID. This ID is the unique string found in the URL path, such as /api/getFile/**b8XwXtJmfNdwdG**/, which is visible in the nginx access log or directly in the OS installer's console output.
You can also monitor the installation process in real-time using the following command:
tail -f /var/www/agent/storage/logs/lumen-$(date +"%Y-%m-%d").log | grep -i pxe
If there is a connectivity issue between the agent and the mirror or any other download error, the raw error message will appear in these logs.
Failed to run preseed command / The post-installation script failed
This error occurs when the installation post script stored in the PXE profile contains errors or when the agent cannot be reached during script execution.
The installation post script is configured in the PXE profile under the "Default Post Installation Script" option. By default, this field is empty at most default PXE profiles. If a custom post script has been added and contains syntax errors or invalid commands, the installation will fail with this error.
- Review the PXE profile details to ensure the script stored in the "Default Post Installation Script" option is correct and functional. Look for syntax errors, missing dependencies, or commands that might fail in the installation environment.
- If no custom post script exists or the script appears correct, the error may be caused by the agent being unreachable during script execution. The installation screen typically displays a URL that the installer is trying to reach. Call this URL manually from a browser or using curl to see what the response is.
- The exit code shown by the installer provides a good clue about what the issue might be.
Server is booted into operating system but installation is not marked as completed
If the server successfully boots into the newly installed operating system but the installation status in Tenantos remains incomplete, this is typically caused by a callback failure. After the OS installation finishes, the agent must send a completion callback to the main Tenantos server. If this communication fails, Tenantos is never notified that the installation has finished.
It is necessary that the Tenantos agent can reach the Tenantos main server over the public domain (even when using the local agent), as this is how the callback is performed.
SSH into the agent server and search the logs for "cURL error" to identify if the agent is failing to make the necessary HTTP requests to the main server.
grep -i "curl error" /var/www/agent/storage/logs/*.log
If you find cURL errors, this confirms a connectivity issue that is preventing the installation completion callback.
Run the following command from the agent to test connectivity to the main Tenantos server. As mentioned above, even when using the Local Agent, it is still required that the Local Agent (which is the same server as Tenantos) can reach itself via the public Tenantos domain.
curl -vvv https://your-tenantos-main-domain.com
The output will help identify the exact cause of the failure, which could be related to network or firewall issues, DNS resolution problems, or invalid /etc/hosts entries on the agent server.
Server does not boot into PXE / IPMI boot command is ignored
In some cases, particularly with UEFI, a server may fail to boot into PXE mode when an installation is initiated from Tenantos. Instead, it boots directly from the existing operating system on the hard disk. This happens when the server's IPMI firmware ignores the one-time boot command sent by Tenantos.
This issue is not caused by Tenantos but is related to the server's BIOS or IPMI firmware.
Verify Manual PXE Boot
Before troubleshooting further, it is crucial to verify that the server can PXE boot manually.
- Access the server's console, for example via IPMI KVM.
- Reboot the server and enter the boot menu (commonly by pressing keys like F11, F12, or ESC).
- Manually select the network card as the boot device.
If the network card is not offered as a boot option, or if selecting it does not initiate a PXE boot, the server is not correctly configured for PXE booting. This must be resolved in the BIOS/UEFI settings before proceeding.
Possible Causes and Solutions
If manual PXE booting works, but the automated process fails, the problem lies with how the server's firmware handles IPMI commands. The following solutions often resolve the issue:
Update BIOS and IPMI Firmware: This is the most common solution. Firmware updates from the mainboard manufacturer sometimes contain bug fixes that address issues with IPMI boot commands. Ensure both are updated to the latest available versions.
Change Boot Mode in Tenantos: Some firmware does not correctly report its current boot mode (legacy vs. UEFI) via IPMI. When "Auto" is selected, Tenantos relies on this reported mode to decide which PXE boot command to send, which can result in the wrong command being used even though manual PXE boot works.
- In Tenantos, navigate to the server's page, go to "Configuration", and edit the "PXE Installation" connection assignment.
- Change the "Boot Mode" option from "Auto (default)" to "UEFI".
- Save the changes and try the installation again.
Setting the mode explicitly to "UEFI" instructs Tenantos to skip the firmware-dependent boot mode detection and always send an IPMI command that marks the next PXE boot as UEFI, i.e. ipmitool ... bootdev pxe options=efiboot. This can resolve cases where the firmware does not clearly expose its UEFI capabilities via IPMI, so that "Auto" would otherwise use a legacy-style PXE command.
If this does not resolve the issue, contact the mainboard vendor. Some vendors can provide fixed BIOS releases on request or BIOS builds that enforce PXE boot.
Windows installation hangs at "Prepare Networking"
Screenshot (the error message can also be different)
This problem is mostly related to missing drivers for the network card and is often caused by an incorrect cache directory configuration. If the cache directory is correctly defined, Tenantos will automatically add common drivers to the Windows installer (Tenantos automatically suggests a correct cache directory when adding Windows profiles).
If the problem occurs at virtual servers, you can also try changing the NIC model. Drivers for Virtio are added by default (provided the cache directory is correct). If it works with another NIC, you can be sure that the necessary drivers are missing and add them as described on the page linked above.
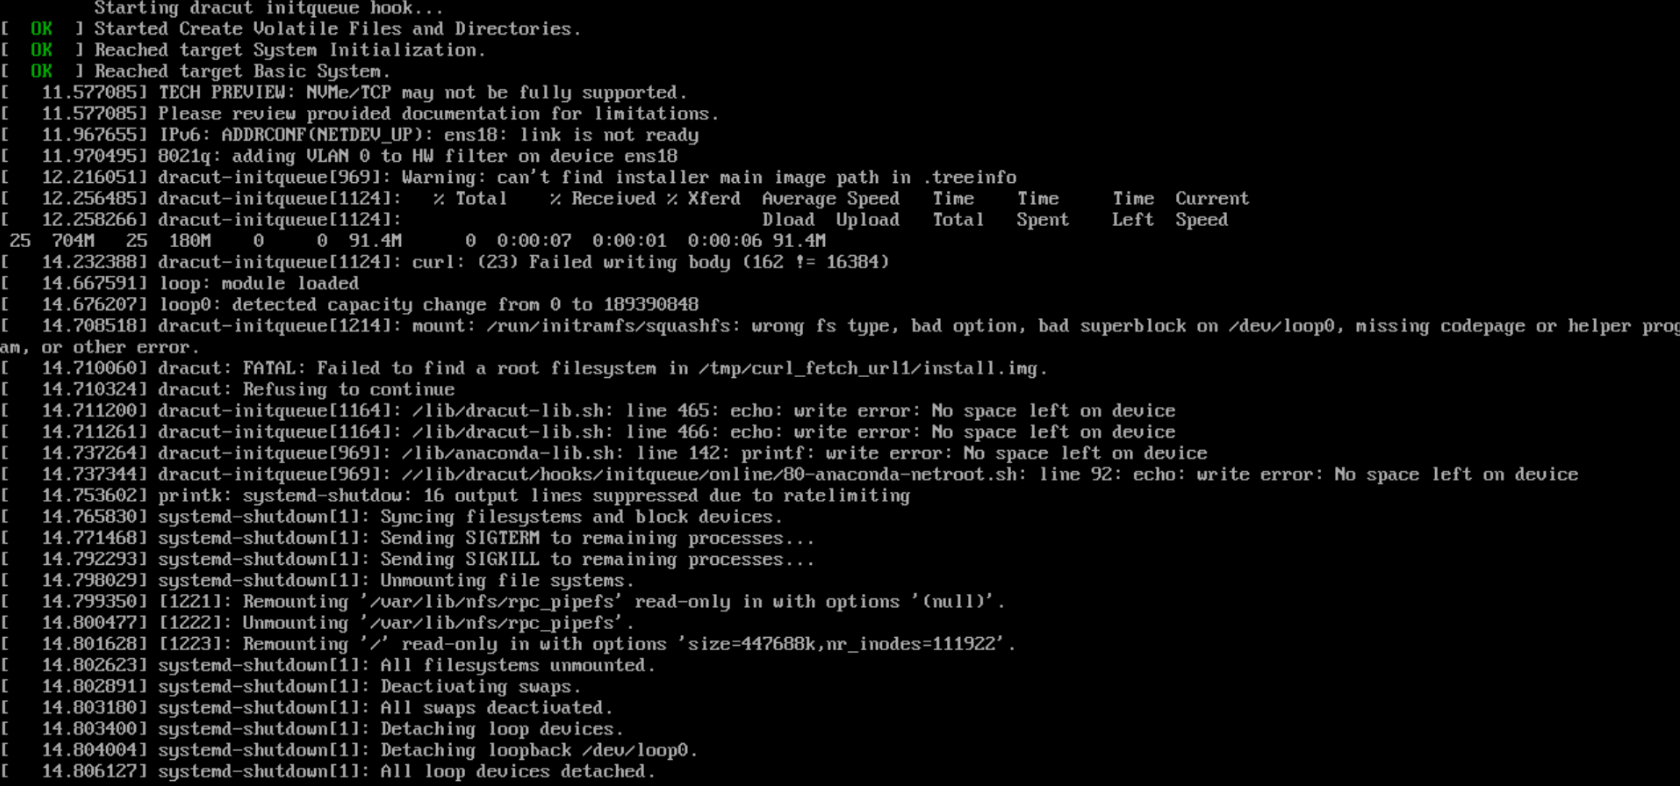
Error: "No space left on device" (affects only VMs)
This error message is typically encountered by virtual machines that have not been allocated enough RAM. In contrast to an ISO installation, a PXE installation loads all installation files into the RAM, and there's no feasible workaround for this.
To solve this issue, more RAM needs to be assigned to the virtual machine. Smaller virtual machines with, for example, only 1 GB of RAM, are unable to be provisioned via PXE due to insufficient memory.
For example, Ubuntu 22.04, with its new "autoinstall" system, currently demands the highest amount of memory (~3.5 GB RAM) during the PXE installation process, as it loads the entire ISO into RAM. Conversely, other operating systems, like CentOS 8, require less memory - CentOS 8, for instance, needs 2103 MiB of RAM. Please keep in mind that these RAM requirements are approximations and can vary with updates to the installation files.
The recommendation is to allocate at least 4 GB of RAM to virtual machines to be ready for future operating systems as well. However, this recommendation is without guarantee, as it is not possible to predict or influence the system requirements of the operating systems.
If enough RAM has been assigned
If the issue persists despite having sufficient memory and if Proxmox is being used, it might be due to the "Enable Hotplug" setting being activated in the "Memory Configuration". As explained in the tooltip at the VPS plan configuration, hotplugged memory may result in only a portion of the RAM being available to the installer system.
Please note that disabling this setting in the VPS plan does not automatically update existing VMs. You either need to re-apply the VPS plan to the affected VM, or change the hotplug setting directly in Proxmox.
"But the installation via ISO file works"
As outlined above, the system requirements for ISO and PXE installations differ. We do not have control over these system requirements, and the VMs must be equipped with sufficent memory to successfully carry out PXE installations.
For Proxmox, you may use template-based installations instead of PXE installations. However, bear in mind that while template-based installations may be quicker and less memory-intensive, PXE installations offer significantly greater flexibility.
Proxmox: Kernel panic when installing RHEL 9 (and derivatives such as AlmaLinux 9)
When attempting to install RHEL 9, or its derivatives such as AlmaLinux 9 or Rock Linux 9, on Proxmox, the installation process may fail with a kernel panic if the CPU type is set to "kvm64" or to a type that does not support the "x86-64-v2" CPU flag. RHEL 9 and its derivatives require the "x86-64-v2" CPU flag for a successful installation.
To resolve this issue, please adjust the CPU type of the affected VM and set the CPU type in the VPS plan configuration to a type that supports "x86-64-v2", such as "host".
Please note that changing this setting in the VPS plan does not automatically update existing VMs. You will either need to re-apply the VPS plan to the affected VM, or change the CPU type directly in Proxmox.
For additional information, please refer to this discussion on the Proxmox forum.