Manage External Providers
Click on "External Providers" in the sidebar to open the external providers page.
On the overview page, you can see all the providers you have added and other attributes like the usage count.
Add a new Provider
- Click on "External Providers" in the sidebar to open the external providers page.
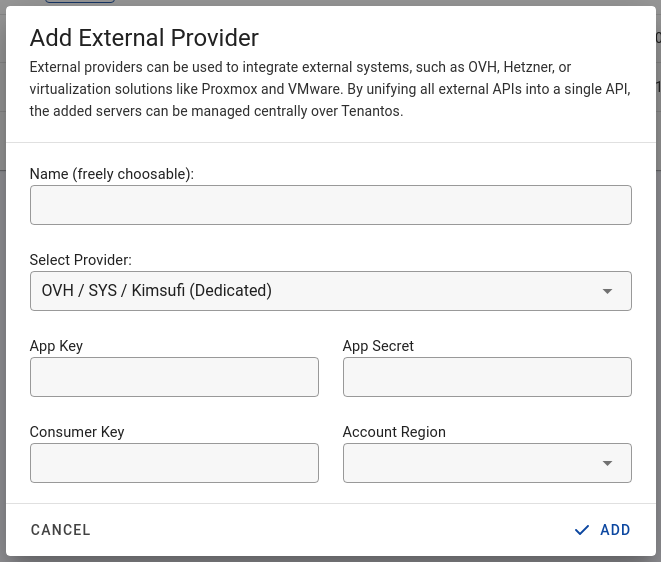
- Click on the plus button and fill out the form:
- Name: The name is freely choosable. It should be a name you easily recognize.
- Select Provider: Select the provider which you want to add.
The other fields differ depending on the provider. You can add the same provider multiple times if you have multiple accounts.
After the provider has been added, a connection assignment can be added to the servers. More information about connection assignments can be found here.
Proxmox
Proxmox single-nodes and clusters are supported. PAM and PVE authentication is supported.
- URL: Enter the hostname of your Proxmox servers. In the case of a cluster, just add one node. All other nodes are automatically detected.
- Username: Usually root.
- Password: The root password
VM Name
This option specifies if the server name or the hostname should be used as the VM name in Proxmox. The recommended option is "Use hostname" and "Use server name" should only be selected if the server name is always a valid hostname.
Periodically VM name synchronization
If enabled, server names from the app will be synchronized to Proxmox every three hours, ensuring that the server names in Proxmox match those in Tenantos.
Synchronize server tags to Proxmox
When activated, the server tags will be synchronized with Proxmox upon any changes. Additionally, the tags are synchronized every few hours to Proxmox to ensure consistent data across the system.
Note that tags set in Proxmox will be overwritten. If you have any custom tags in Proxmox, make sure to add them in Tenantos before activating this feature.
Metrics Downsampling Rate
The Proxmox API provides resource usage data every minute (CPU, RAM, disk I/O). This setting controls how many of those data points are stored. A value of 1 stores every point (no downsampling), 5 stores every 5th point. Lower values result in higher InfluxDB RAM and disk usage.
Default: 5 (= 5 minutes)
VMware
ESXi and vCenter are supported.
- URL: The hostname of vCenter or ESXi
- Username: E.g. administrator@vsphere.local
- Password: The password
Hetzner Cloud
- API Token: Generate API Token
Hetzner Dedicated
- You need to create a webservice user on this page.
OVH / Kimsufi / SYS
- You need to generate the API keys at OVH. Please see this page. ("Create application credentials")
- Screenshot of a filled out form. You can enter the IP address of Tenantos at "Restricted IPs".
myLoc / Webtropia / Servdiscount
- You need to generate the API key on this page. Then enter the key in the "OAuth Token" field.
NovoServe
- Generate the API key by following instructions on this page.
Tailor Made Servers
- The API details can be requested from TMS support.
RDNS Management
With TMS, a standalone RDNS server must be added for managing RDNS entries. After adding TMS as an external provider, navigate to the RDNS Servers page (Sidebar: IP Manager > RDNS Servers) to add the account as an RDNS provider. Afterward, assign the newly created RDNS server as the responsible RDNS server to the desired subnets.
Tenantos
You can find information about the use-cases here.
- Remote Tenantos Domain (without https://): This refers to the domain of the remote Tenantos installation.
- API Token: Generate the API token on the user profile page of the remote Tenantos installation.
RDNS Management
When using Tenantos as an external provider, a standalone RDNS server can be added that reads/writes the RDNS entries from the remote Tenantos installation. Once Tenantos has been added as an external provider, navigate to the RDNS Servers page (Sidebar: IP Manager > RDNS Servers) and add the account as an RDNS provider. Afterward, assign the newly created RDNS server as the responsible RDNS server to the desired subnets.
It is important to ensure the IP assignments for servers are consistent across both Tenantos installations. If the IP assignments aren't identical, the RDNS entries for the assigned IPs can't be managed. In such a case, it would be advisable to set up DNS delegation, enabling your resellers to run their own PowerDNS server.
ReliabeSite
- Generate the API key by following instructions on this page.
RDNS Management
This is only relevant if ReliableSite announces subnets for you or if you manually add the ReliableSite subnets in Tenantos and do not use automatic IP synchronization. If automatic IP synchronization is used, the RDNS server does not need to be added.
If you handle the the IP assignments yourself, follow these steps: Once ReliableSite has been added as an external provider, navigate to the RDNS Servers page (Sidebar: IP Manager > RDNS Servers) and add the account as an RDNS provider. Next, assign the newly created RDNS server as the responsible RDNS server for the desired subnets.
InterServer
- Generate the API key on this page

